Getting started
Regardless of your ROM version, you can load BASIC into the Gigatron using the Pluggy McPlugface keyboard adapter. This works because the adapter has a BASIC image stored in it, and it can speak the Loader protocol. To load BASIC using this method, first start Loader from the main menu and then hit [Ctrl-F2].
If your board runs ROM v3, it’s easier to select BASIC directly from the main menu.
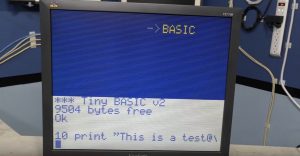
*** Tiny BASIC v2
9504 bytes free
Ok
█
At startup, BASIC counts and displays the amount of free program memory. It prompts ‘Ok’ and shows a cursor symbol to indicate that it’s ready to receive commands.
The Gigatron has 32K of working memory or RAM. About 19K of that is taken by the video display. 3K is used for the BASIC interpreter and almost 1K is needed for things like system variables and stack space. This leaves a bit over 9K for BASIC programs and variables.
Tiny BASIC v2
Most of the commands are pretty standard, but still, every BASIC dialect is somewhat different from the other. The full set of commands supported by the Gigatron is:
Original Tiny BASIC:

PRINT           LET             INPUT
GOTO            REM             END
IF/THEN         GOSUB/RETURN    USR()
RUN             LIST            NEW

Gigatron Tiny BASIC v2:

AT              PUT             FOR/TO/NEXT
MODE            RND()           CLS
POKE/PEEK()     SAVE            LINE
:               ?               '
%               A(I)
We’ll walk through all of these next.
Entering lines
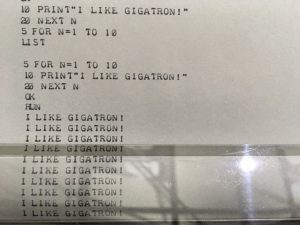
Lets type in a simple program:
10 rem Test program
20 print "I like Gigatron!"
30 goto 10
█
All program lines in BASIC begin with a line number that must be typed in as well. We normally use multiples of 10 to make it easier to insert lines later. If you enter a lower line number than the last one, BASIC will automatically insert it at the right place.
If you enter a line number that’s already present, the older one is removed. This way you can modify or delete a line.
Type LIST to see your program in the right order.
RUN starts the entered program from the first line. Our BASIC is case-insensitive, so ‘run’ means the same as ‘RUN’.
run
I like Gigatron!
I like Gigatron!
I like Gigatron!
I like Gigatron!
I like Gigatron!
I like Gigatron!
I like Gigatron!
I like Gigatron!
I like Gigatron!
I like Gigatron!
?Break error in 10
Ok
█
The GOTO 10 command in line 30 keeps the program running in an infinite loop. Without it, the program would print the message just once and then end.
You can abort a running program with [Ctrl-C]. If you have a long program, you can stop LIST with [Ctrl-C] as well.
Writing text
The REM (‘remark’) command is used for comments: whatever follows on the line is ignored.
The PRINT command writes text and numbers to the screen.
If you omit the line number, the command you typed will be executed immediately. This way you can quickly see what a command does.
print "Hello"
Hello
Ok
█
For convenience, PRINT can be abbreviated to ‘?’. REM can be abbreviated to a single quote (‘).
?"The answer is:",42
The answer is:    42
Ok
?"abc";123
abc123
Ok
█
PRINT arguments separated by a comma will be spaced apart when written to the screen. Arguments separated by a semicolon will be smashed together.
You can use AT to indent a given number of pixels.
at 80:print "@"
                @
Ok
at 86:put 64
                 @
Ok
█
As you can see, PUT writes a character with a given ASCII code (32…127).
Also note that you can place more than one command on a line as long as you separate them by a colon (‘:’). The line must not become wider than the screen when you do this.
If the line gets too long, a backslash (‘\’) is shown at the end to signal the issue. Mind that when this happens, the line will not have been accepted!
Calculations
PRINT, LET and all other commands taking a number as an argument can also do calculations. You just give them an arithmetic expression that will be evaluated by the command each time it runs. Operators can be + (add), – (subtract), * (multiply), / (divide) and % (modulo).
The order of operation is as in school: left to right, but multiplication and division go before addition or subtraction. Use parentheses to enforce a different evaluation order.
print -1+2*(3+4*5)
45
Ok
█
All calculations are done with integers. So 15 / 7 gives 2, not 2.142857. To get the remainder after division, use the modulo operator %.
print 15/7, 15%7
2    1
Ok
█
With RND(n) you can randomly draw a number smaller than n.
print rnd(6)
4
Ok
print rnd(6)
0
Ok
█
Integers are signed and 16-bits wide, meaning that they can range from -32768 to 32767. Calculations quietly wrap around on overflow.
Variables
You can use variables to store the result of a calculation.
let y=1975
Ok
let x=(2018-y)*12
Ok
let y=0
Ok
print x, y
516  0
Ok
█
The LET keyword is optional and can be left out.
Variables are identified by a single letter. They’re case-insensitive as well: ‘a’ denotes the same variable as ‘A’.
INPUT prompts the user to type in new values for one or several variables.
input a,b
a?
123
b?
456
Ok
?a+b
579
Ok
█
With FOR, TO and NEXT you can let a variable walk through a range of numbers.
10 input n
20 for i=1 to 10
30 print i;"*";n;"=";i*n
40 next i
run
n?
7
1*7=7
2*7=14
3*7=21
4*7=28
5*7=35
6*7=42
7*7=49
8*7=56
9*7=63
10*7=70
Ok
█
FOR loops can be nested if each loop uses its own variable.
10 for y=0 to 2
20 for x=0 to 2
30 print 3*y+x+1,
40 next x
50 print
60 next y
run
1    2   3
4    5   6
7    8   9
Ok
█
Graphics
CLS clears the screen and moves the writing position to the top.
We’ve already seen AT x. When given a second argument y, it moves the writing position to the x, y pixel coordinate. The origin 0, 0 is the top-left corner.
This bouncing ball example uses AT to position the ball:
10 REM BOUNCING BALL
20 X=2:V=6
30 CLS:ATX,60
40 FOR I=1 TO 25
50 AT X:PUT 32:REM CLEAR
60 X=X+V
70 AT X:PUT 79:REM DRAW O
80 NEXT I
90 V=-V
100 GOTO 40
LINE x, y draws a line starting from the current writing position, x pixels to the right and y pixels down. These values may be negative, and lines wrap around the edges of the screen when needed.
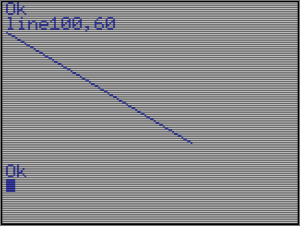
With AT x, y you normally set the starting point first. If you omit it, the end point will become the next starting point.
Finally, MODE n changes the video mode, where n denotes the number of black scan lines per pixel line. It can be 0, 1, 2 or 3. The default mode is 1. The higher this number, the dimmer the screen, but the faster programs run. This is because applications only run when the Gigatron is not busy sending pixels to the screen.
The user can always change the video mode with the [Select] button on the game controller, or with the [PageDown] key on the keyboard.
PEEK and POKE
With PEEK and POKE you can access the memory directly. PEEK(a) reads the byte value stored at RAM address a. POKE a, b writes the byte value b to memory location a.
You should be careful here: Most memory locations have a designated purpose for Gigatron operation, and unexpected things can happen if you interfere with those. But with some addresses you can do useful things that aren’t possible with other BASIC commands.
For example, memory location 43 holds the pen color for writing text and drawing lines. There are 64 colors, numbered 0 to 63. They are RGB values calculated as Red + 4*Green + 16*Blue. Above 63 the colors just repeat, so 64 is the same as 0 (black).
print peek(43)
53
Ok
█
53 is the default pen color, with Red=1, Green=1 and Blue=3
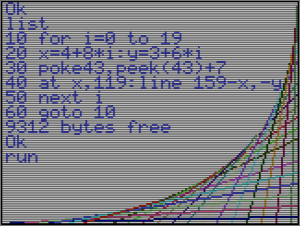
10 for i=0 to 19
20 x=4+8*i:y=3+6*i
30 poke43,peek(43)+7
40 at x,119:line 159-x,-y
50 next i
60 goto 10
run
This program draws lines in ever-changing colors.
Unlike the home computers of the early 1980s, in the Gigatron pixels are addressable as bytes. This means that it’s easy to plot points with the POKE command: just calculate the pixel address, and write a color value there.
Default video memory starts at address 2048, with each 256-byte memory page holding a line of 160 pixels. The remaining 256 – 160 = 96 bytes in each page are used by BASIC and we’ll briefly discuss that later on as well.
So the simple way to make a central pixel black is:
cls
Ok
x=160/2:y=120/2
Ok
poke 2048+y*256+x,0
Ok
█

Video indirection table
While the above works, there’s a catch: the mapping from x, y coordinate to memory address is not necessarily fixed. The Gigatron video generation loop uses an indirection scheme that goes through a table. This video table makes it possible to scroll the screen with very little effort. The only reason the above example works is because the CLS command restores the vertical mapping to its default state.
The video table starts at memory address 256, and it has a pair of bytes for each of the horizontal 120 pixel lines, for a total of 240 bytes. The first byte in each pair, at the even address, is the page number where pixel data will be read for that line. It typically has a value between 8 and 127. The second byte is an offset in horizontal direction. This offset is relative to the previous line, and normally it’s just 0.
When BASIC scrolls the screen, it manipulates the video table instead of moving pixel data around, which would be very slow.
With that in mind, a somewhat better way to calculate a pixel address is as follows:
p=peek(256+2*y)*256+x
Ok
poke p,0
Ok
█
This still ignores the horizontal offsets, but normally that’s ok.
It can be quite interesting to play with this video indirection scheme. For example, you can scroll the entire screen horizontally by writing to address 257.
poke 257,-10
Ok
poke 257,0
Ok
█
The first command shifted the entire screen 10 pixels to the right. The second command restored it.
If you want to turn the bottom 8 lines into a scroller, you can do this:
v=257+112*2
Ok
fori=0to256:pokev,i:nexti
Ok
█

The garbage pixels you see scroll by are the bytes used by BASIC itself. The flashing pixel is where the loop variable ‘i’ is stored! It can be interesting to see how BASIC is organised by making its memory always visible:
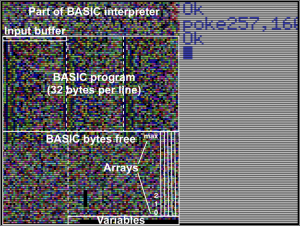
cls
Ok
poke 257,160
Ok
█
The guts of BASIC are now shown live on the screen. Part of the BASIC interpreter itself can be seen on top. The input buffer is next and you can see its contents change while typing. Immediately following is the BASIC program. Variables are at the bottom. The arrays stretch vertically in the unused area in between. You can experiment with running or changing a program to see what happens, and you can see the effect of vertical scrolling and the CLS command.
Blinkenlights
The four LEDs normally run in a fixed pattern, but you can change that. First, memory address 47 controls their speed. With the following commands they first run fast, then slow, and then go back to normal.
poke 47,5
Ok
poke 47,120
Ok
poke 47,9
Ok
█
Much more interesting is that you can pause the sequence, and then control the lights directly yourself. Please note that the following doesn’t work in ROM v1, but there’s a work-around method explained here.
First we stop the sequence:
poke 46,1
Then we turn off all LEDs. Address 20 controls which LEDs are on and off. You can set it to a value from 0 to 15 for each possible combination.
poke 20,0
Only turn on the left LED:
poke 20,1
All lights on:
poke 20,15
Restart the standard sequence:
poke 46,0
Program control
We’ve already seen FOR/TO/NEXT and GOTO as commands to control the order of execution. There are a few more useful ones:
IF/THEN compares two numbers and only executes the rest of the line when the comparison holds. For example, to set M to the smallest of A and B:
M=A: IF B<A THEN M=B
The comparison operator can be =, <, <=, >, >= or <>. The command after THEN can be any type or group of commands, as long as it all fits on the same line. It’s very common to use just a GOTO here to hop to another line number instead. In that case the THEN keyword is often omitted, as it’s optional anyway.
IF I<N GOTO 40
Specific to all Tiny BASICs is that the line number can come from a variable, or even from a complex expression. Some interesting control flows are possible with this.
GOTO 100+10*I
GOSUB is much like GOTO, except that it remembers where it came from using the stack. The target lines are called a subroutine. Subroutines are handy when the same group of commands are needed in different parts of the program. You can keep the logic in one place, and use GOSUB to execute it where needed. After doing its thing, the subroutine gives program control back to where it was called using the RETURN command.
GOSUBs can be nested as long as stack space permits. A stack error will be given once that space is exhausted, or when a RETURN is attempted without a matching GOSUB. As the Gigatron can go more than 50 levels deep, this error most likely indicates a logic error somewhere in the BASIC program.
The last control command is END. This immediately stops the program and goes back to the ‘Ok’ prompt. Normally we don’t need END, because this also happens after executing the last line of a program.
With these we can make more complex programs, which will come in handy in the next section.
Sound effects
To replay the Gigatron start-up chime for 1 second, we use address 44:
poke 44,60
This address is for the sound countdown timer. Normally it reads 0 and that means that all sound is off. If it’s positive however, all four software-generated sound channels will be forwarded to the extended output port (U38). The timer counts down 60 times per second.
The four channels are in fact always busy, but address 44 controls if they will be heard or not. Therefore, the sound you just heard is the sound programmed during system startup: a G-major chord (G-3, G-4, B-4 and D-5) in sawtooth waveform.
Each sound channel is independent, and can be programmed with a waveform, a frequency and some harmonics altering attributes. You can’t really switch a channel off, but you can set their frequency to 0 which is effectively the same. For experimentation, lets first switch off channel 2, 3 and 4. This is easiest with a little program.
new
1 for c=2 to 4
2 p=c*256+252
3 poke p,0:poke p+1,0
4 next c
run
Ok
poke 44,60
Ok
█
You now effectively only heard the first channel.
To change the tone from a sawtooth into a pulse, use:
p=256+250
poke p+1,2:poke 44,60
The value 2 sets the pulse tone. The difference is easy to hear because it’s the clearest of all. You can also set 1 for a triangle, or back to 3 for a sawtooth. The value 0 creates a metallic sound that can be used to generate noise.
The following program changes the TTL computer into a single octave piano.
'Tiny Piano demo
1 for c=1 to 4
2 p=c*256+252
3 poke p,0:poke p+1,0
4 next c
5 mode 2:cls
6 ?" 2 3   5 6 7"
7 ?"Q W E R T Y U I"
8 poke p-2,2
9 k=peek(15):'serialRaw
10 if k>126 goto 9
11 gosub k
12 poke p,a:poke p+1,b
13 poke 44,30:goto 9
50  a=11 :b=9 :return
51  a=25 :b=10:return
53  a=16 :b=12:return
54  a=78 :b=13:return
55  a=35 :b=15:return
101 a=103:b=10:return
105 a=19 :b=17:return
113 a=73 :b=8 :return
114 a=57 :b=11:return
116 a=108:b=12:return
117 a=23 :b=16:return
119 a=80 :b=9 :return
121 a=53 :b=14:return
Address 15 is where the system stores, once per video frame, the contents of the 74HC595 shift register that serves as the input port (U39). When a key is pressed on the keyboard, it will read as its ASCII code. The idle state is 255. If a game controller is connected, each bit corresponds to one of the buttons.
In the piano program, the variables a and b together determine the frequency of the played note. You can convert these values to a frequency f, in Hertz, with the following formula:
f = (a + b*128) * 31250 / 2^17 Hz
For example: a=73, b=8 gives 261.5 Hz (or C-4).
The Gigatron EPROM contains a frequency table with all notes from C-0 to A#7. In the advanced section about USR() we’ll see how to access this table.
Arrays
Quite advanced programs are possible once you can store values in arrays. Arrays are like lists or tables of values that are accessed by appending parenthesis to the array name, and with an index between them:
a(i) = x
In Tiny BASIC v2 arrays are one-dimensional, meaning there’s no such thing as a(i,j). Like variables, their names can be chosen from ‘a’ to ‘z’, but they’re still different entities from the regular variables. Indexing starts at 0 and the array size is determined by the remaining free memory. By default, the maximum index is 98 on the 32K system and this number becomes lower the more space your program needs for itself. If you try to read or write an array beyond the available space, you’ll get a value error. If your Gigatron has 64K, its arrays can hold over 200 items each.
There’s no need to set arrays up with a DIM command, as is the case in some other BASICs. Unlike regular variables, arrays will not be cleared at the start of a program.
The Fibonacci program uses arrays to implement numbers of arbitrary length. The Pi program uses arrays to calculate 28 digits of π.
Storing a program
Type SAVE to store the current program into the keyboard adapter’s or Arduino’s EEPROM area. Note that the Pluggy McPlugface keyboard adapter has just enough space for one small program of approximately 20-30 lines (0.5K). The Tiny Piano program above will (just) fit.
If you hookup an Arduino-compatible device, you can save larger programs. You can also send them to your computer over the Arduino’s USB cable.
While saving, video output might flicker, depending on your monitor brand. This is because the transmitted data is piggybacked on a signal that is shared with the video connector.
Always check if saving was successful! A break error indicates that saving has failed. This can happen if a key was pressed while saving, or if the program is too large for the EEPROM.
Use NEW to erase the current program from memory. Be careful with this! There’s no command to undo this once you’ve hit enter.
Hit [Ctrl-F3] to load the stored program back into BASIC.
Advanced features
The USR() function calls directly into 16-bit vCPU machine code. This is a useful escape mechanism for accessing functionality not available in any other way. You can also use this to implement critical code segments in assembly for speed.
The example below plays all notes from “C-0” to “A#7” by reading the frequency values from the built-in table at ROM address $900. A tiny piece of vCPU assembly performs the table lookup. In true retro computing style, this subroutine is self-modifying to ease the reading of consecutive byte values from the table.
'
' Setup sound channels
'
10 for c=1 to 4
11 p=c*256+252
12 poke p-1,2:'Pulse
13 poke p,0:poke p+1,0
14 next c
'
' Setup vCPU note lookup
'
20 poke 129,17:'LDWI $9xx
21 poke 131,9
22 poke 132,127:'LUP 0
23 poke 133,0
24 poke 134,147:'INC 130
25 poke 135,130
26 poke 136,255:'RET
'
' Play all notes
'
30 for n=1 to 95
31 print "Playing note",n
32 poke 130,n+n:'$900+n*2
33 poke p,  usr(129):'Flo
34 poke p+1,usr(129):'Fhi
35 poke 44,15;'0.25 secs
36 if peek(44)>0 goto 36
37 next n
You can learn more about vCPU programming from the Docs/GCL-language.txt document in GitHub.
Example programs
There are several example programs in GitHub for study. The file extension is GTB, which stands for “Gigatron Tiny BASIC” or “GigaTron BASIC”. They can be openend with a text editor. Some of the more interesting ones are:
- BM9.gtb: Classic prime number benchmark
- Blinky.gtb: Pixel addressing with POKE
- BouncingBall.gtb: Bounce a ball with AT and PUT
- Charset.gtb: Print built-in character set with PUT
- Disc.gtb: Draw filled circle with AT and LINE
- FastLines.gtb: Line drawing demo with AT and LINE
- Fibonacci.gtb: Bignums with arrays
- Gigatron.gtb: Printing text in colors
- Input.gtb: Use INPUT and show multiplication table
- LEDs.gtb: Control the blinkenlights
- Notes.gtb: Read ROM table for note frequencies
- Pi.gtb: Calculate the first 28 digits of π
- RandomBlocks.gtb: Plot block characters in random colors
- Scrolling.gtb: Horizontal scrolling using the video table
- TicTac.gtb: Tom Pittmans’s Tic-Tac-Toe
- TinyPiano.gtb: Piano program with key press detection
Only TicTacToe is a large program. You don’t need to type it in, as it’s included in ROM v3. When it’s running you can interrupt it with [Ctrl-C] and then view it with LIST. However, when a BASIC program is waiting for user input, you’ll find that stopping the program with [Ctrl-C] won’t work. In that case, the easiest way out is to type something non-sensical (such as ‘,’ or ‘?’) to force a syntax error and return to the ‘Ok’ prompt.
Instead of typing them in, GTB programs can also be loaded into the Gigatron through an Arduino-compatible microcontroller and the sendFile.py program (Python 2.7) on a laptop or PC. More on that in the Tutorials section of the website.
Finally
This concludes our introduction to Tiny BASIC v2. We hope this tutorial helps in your understanding of how the Gigatron works, and inspires you to make programs of your own. This can be in BASIC, but also vCPU or even in native 8-bit machine code. Remember there’s the user forum at https://forum.gigatron.io/ for all your questions and sharing of cool results. Please subscribe and participate in the community!
Did you know?
Microsoft’s first product was their BASIC interpreter for the Altair 8800 microcomputer.
There were 4K and 8K versions, and it had to be loaded from paper tape.
Input and output were done through a Teletype standing next to the machine.
Many hobbyists preferred to copy rather than buy it. This prompted Bill Gates to write his Open Letter to Hobbyists to complain about this practice.
Dennis Allison designed Tiny BASIC as a free alternative to Microsoft’s BASIC for microcomputers.
The birth of Tiny BASIC also marked the start of the Dr. Dobbs Journal in January 1976.
As it was so small and simple, programmers created versions for all kinds of different microcomputer systems.
These ports or reimplementations were typically just 2-3 kilobytes in size.
Tiny BASIC can be considered the first success story for open-source software.
Our Tiny BASIC v2 is an extended version specially written for the Gigatron.
It’s written as a 16-bit vCPU assembly program using GCL notation. Like most implementations, it doesn’t use the Intermediate Language (IL) from the original proposal.
Tiny BASIC v2 is still just under 3 kilobytes in size, and probably the only version with a line drawing command.
Some quirks
While -32768 is a valid 16-bit integer value, you’ll have to enter it as -32767-1 to avoid getting a syntax error.
The unary minus can’t immediately follow an operator. For example, the expression ‘a * -b’ must be entered as ‘a * (-b)’.
For compatibility with some versions of Tiny BASIC, ‘@’ is accepted as a valid variable name. So there are in fact 27 variables in total.
The backquote character (`) happens to be recognised as the “lowercase of @”. Using this as a variable name is just silly.
When asking for a value with INPUT, you can enter any valid expression and it will be evaluated on the spot. You can even reference program variables in it, use RND(), PEEK() etcetera.
When the INPUT command is waiting for user input, stopping the program with [Ctrl-C] won’t work. In that case, the easiest way out is to type something non-sensical to get a syntax error.
FOR loops won’t iterate correctly over more than 32768 values.
Tiny BASIC is a bit slow because it parses every line again and again while executing. In interpreter jargon: there’s no tokenizer. However, this simplicity also allows it to be tiny and easy to port to new computers (such as the Gigatron).